Monster Hunter Wiki
Advertisement
Monster Hunter Wiki


Deviljho is a Brute Wyvern first introduced in Monster Hunter 3. It is known to inhabit a wide variety of environments and can be encountered at High and G ranks.

MH4-Deviljho Render 001

Physiology

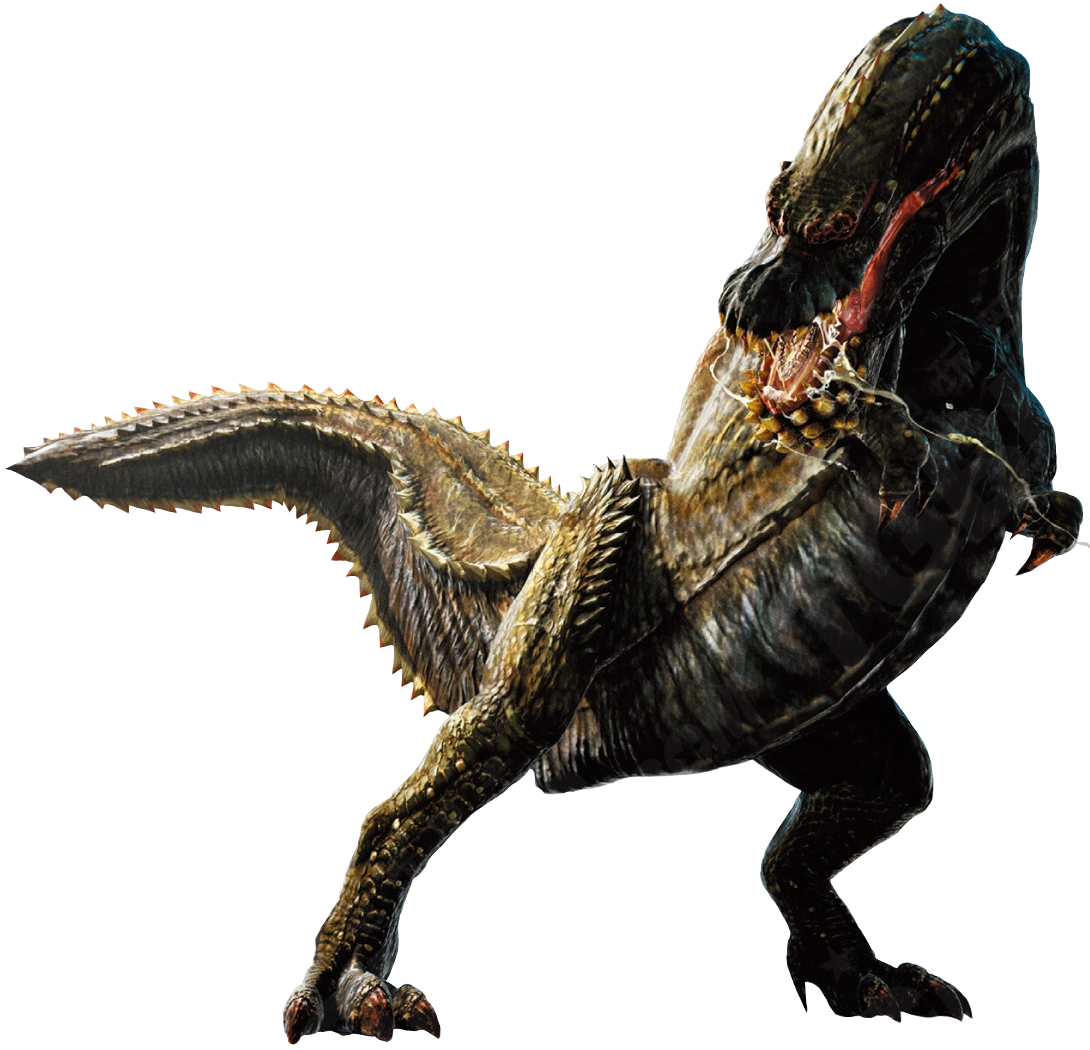
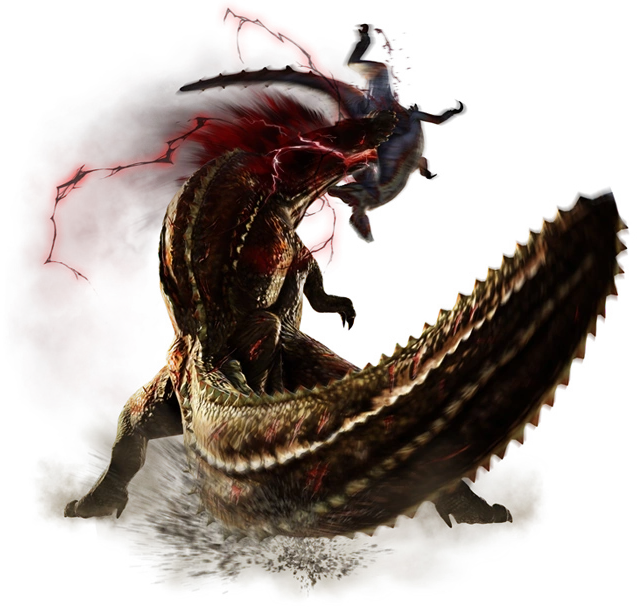
Deviljho is a very large, bipedal Brute Wyvern characterized by its uniform forest green colouration and muscular upper body. Its thick hide is littered with short, jagged spines that reach a maximum height along the back and tail. Deviljho has a narrow snout with a large lower jaw, covered in multiple rows of spines spreading outwards from the teeth. It has massive, powerful hind legs, but tiny, poorly developed forelegs that it rarely utilizes. When provoked, Deviljho's back and shoulder muscles swell considerably. During this period, areas of its skin will take on a bright red colouration.

Abilities

Deviljho is armed with a powerful set of jaws which it can use to deliver bone-crunching bites to prey and foe alike. In addition, its powerful hind legs allow it to run at relatively high speed and leap considerable distances towards prey. When enraged, Deviljho is capable of producing a mysterious clouded emission which can be shot out of the mouth in a stream at prey. This substance contains the Dragon Element and can be very deadly to hunters and other monsters.

Behavior

Deviljho is a nomadic monster, prone to wandering vast distances in search of prey. Its status as a super-predator allows it to overtake the territory of any monster that stands in its path. Because of the extreme amount of energy its body consumes, Deviljho is always in search of food sources. It is known to be cannibalistic, and is also prone to eating prey alive in order to waste as little time as possible in replenishing its energy.

Habitat

Because of its nomadic nature, Deviljho is known to inhabit a wide variety of environments, such as Tundra, Deserted Island, and Volcano. Its presence is often disruptive to the natural ecosystem.


Other Non-Subspecies Forms

Savage Deviljho

MH4-Savage Deviljho and Great Jaggi Render 001

Main Article: Savage Deviljho

Deviljho makes a return in Monster Hunter 3 Ultimate along with its variant known as Savage Deviljho (怒り喰らうイビルジョー). Savage Deviljho appears slightly different comparing to Deviljho when it is in its enraged state.


Game Appearances

Chronological Appearances
First US / EU Appearance: First JP Appearance: Latest Appearance:
Logo-MH3 EN (2010) Logo-MH3 JP (2009) Logo-MH4U (2015)


In-Game Description

Monster Hunter 3
MH3-Deviljho Icon The dreaded, nomadic Deviljho have no specific territory of their own. Their muscles swell if provoked, revealing old wounds. Needing to feed constantly due to high body heat, they can hunt nearby animals to extinction.
Monster Hunter Portable 3rd
MHP3-Deviljho Icon 別名“恐暴竜”。特定のテリトリーを持たず、餌を求めて常にさまよい歩いている。非常に狂暴で、怒りの際には筋肉が大きく隆起し、古傷が浮かび上がる。また、高い体温を保つため常に捕食し続ける必要があり、周辺の生物を絶滅に追い込むこともあるという。
Monster Hunter 3 Ultimate
MH3U-Deviljho Icon The dreaded, nomadic Deviljho have no specific territory of their own. Their muscles swell if provoked, revealing old wounds. Needing to feed constantly due to high body heat, they can hunt nearby animals to extinction.
Monster Hunter 4
MH4-Deviljho Icon 別名”恐暴竜”。 特定のテリトリーを持たず、餌を求めて常にさまよい歩いている。 非常に狂暴で、怒りの際には筋肉が大きく隆起し、古傷が浮かび上がる。 また、高い体温を保つため常に捕食し続ける必要があり、周辺の生物を絶滅に追い込むこともあるという。
Threat Level (危険度): ★★★★★★

Analysis and Guides

For details on older games this monster has appeared in, see Deviljho Guides.


Deviljho Analysis for Monster Hunter 4
Wiki-wordmark
Wiki-wordmark
Wiki-wordmark
Cutting Damage
(Click Image to Zoom)
(Coming Soon)
Impact Damage
(Click Image to Zoom)
(Coming Soon)
Shot Damage
(Click Image to Zoom)
(Coming Soon)
Brighter Red means more damage, while Darker Red means lesser damage.


Raw Hitzone Damage Data
Hitzone Cutting Damage Impact Damage Shot Damage
'
Element Hitzone Damage Data
Hitzone Fire Fire Water Water Thunder Thunder Ice Ice Dragon Dragon
'
This Monster is weakest to: Status Effect-Thunderblight MH4 Icon Thunder or Status Effect-Dragonblight MH4 Icon Dragon


Status Effects Data
Poison Paralysis Sleep Stun Fatigue Blast Mount
Initial Tolerance N/A N/A
Max Tolerance N/A N/A
Tolerance Increase N/A N/A N/A N/A N/A N/A N/A
Duration N/A N/A N/A
Damage N/A N/A N/A N/A N/A N/A
Item Effectiveness Data
Item Name Able
Effectiveness
Duration
Normal Enraged Fatigued
Pitfall Trap Yes N/A N/A (?)
Shock Trap Yes N/A N/A (?)
Flash Bomb Yes N/A N/A (?)
Sonic Bomb No N/A
Meat Yes N/A N/A (?)


Music Themes

Monster_Hunter_3_(tri-)_OST_-_Deviljho_Fight MH3: Deviljho and Savage Deviljho Music Theme


Notes

General Notes


  • Deviljho usually prey on Aptonoth, Popo, Slagtoth, or Gargwa to recover stamina.
    • It sometimes eats from the corpse of a slain monster, its own tail, or an already captured monster. It sometimes attacks other monsters in the area if it's hungry; thus, dealing damage to them.
  • Like many other monsters, such as the Nargacuga, Zinogre, and Lagiacrus, the Deviljho enters a rage state. Its main body becomes enlarged with red streaks over the top of its back, near its mouth, and many tiny red marks all over. It begins breathing Dragon lightning around its mouth. This will not hurt you, but it will do its signature Dragon Breath attack at least twice until it calms down.
  • Deviljho can leap at a hunter and pin them down, before attempting to devour them. Each bite will cause a significant amount of damage, until the player is able to break free or throw a Dung Bomb. Another hunter who is not pinned can throw a dung bomb for the same effect. If the Deviljho is exhausted, it will recover stamina and inflict Defense Down on the pinned Hunter due to its corrosive saliva. [1]
  • Deviljho performs a Dragon Breath attack at a 180 degree angle sweep from right to left. The only safe spots during this attack are, near its tail or underneath Deviljho. If a player finds itself within the range of the breath, the best options are to block with a shield, or panic dive away. It is possible to evade this attack by rolling but it's unsafe to do so unless the timing is spot-on. The Dragon Breath attack has extended reach from 30 m/129 ft up to 35 m/140 ft.
  • Many of Deviljho's movements include damaging the players via the swing of its tail. When the tail is severed, it would stumble away from it because of the massive weight loss, causing it to lose balance.
  • It's rock flinging attack may reach up to 40 m/148 ft maximum range (in game range calculation).
  • Even though Deviljho can cause great damage to the ecosystem, it is not an Elder Dragon.
  • Deviljho closely resembles the real world Tyrannosaurus Rex.
  • Deviljho's Rock Fling attack will inflict different Blights depending on the area. In Tundra, it inflicts Iceblight, in Volcano it inflicts Fireblight, and in Flooded Forest it inflicts Waterblight.
    • Deviljho is capable of throwing rocks from land and hitting hunters in the water in the Flooded Forest, including hunters under the surface.

Monster Hunter 3


  • When fought in the Tundra, Deviljho will limp away to Area 1 and break into a hidden area to rest. The unlocked area is one of the few places where Dragonbone Relics can be gathered.
    • If Deviljho is not weakened and is in Area 1, the blockade can still be broken down if Deviljho attacks it. If Deviljho breaks the blockade on its own, without the hunter baiting it into attacking the rubble, it drops a shiny.
  • If Deviljho uses a 'Stomp' Attack in Area 7 of the Tundra, icicles will fall from the ceiling causing minor damage to anyone they hit.
  • There was an event quest, where an extremely large Deviljho (called a "World Eater") was in the Deserted Island. Because of its size, weapons can barely reach its underside.
  • Deviljho can no longer be hunted in Monster Hunter 3 because the online servers have been shut down.

Monster Hunter Portable 3rd


  • Deviljho has a new attack where it quickly swings its tail first to its right, then around itself to its front while slightly moving forward during the attack. Because of its swift speed compared to the rest of Deviljho's attacks, it can be tricky to avoid if it catches hunters off-guard. The best way to avoid this attack is to quickly get underneath Deviljho.
  • Its Dragon Breath no longer inflicts Dragonblight because the Dragonblight status ailment has been removed in Monster Hunter Portable 3rd. The Dragonblight effect returns in later games.
  • Deviljho can now be fought in the very last village quest. It will appear in the Land Arena (with its own introduction cutscene), and after it has been slain or captured, Tigrex and Nargacuga will be fought simultaneously. Despite being met in a Low Rank Quest, the three monsters are as powerful as their High Rank equivalents much like the final Village Quest Monster Hunter in Monster Hunter Freedom Unite where monsters were G-Rank.
  • Like Duramboros, it may counter-attack the hunter immediately after it staggers, like when its face has been broken but only on the second time.

Monster Hunter 3 Ultimate


  • There is an event quest, in which the hunter must defeat a Deviljho without any piece of armor.

Monster Hunter 4 Ultimate


  • Deviljho can now climb with its mouth.
  • Savage Deviljho is able to use a new type of attack in which it grabs the hunter in its mouth and carries them around while attacking other players.
  • In Monster Hunter 4, Deviljho couldn't be infected by the Frenzy Virus but in Monster Hunter 4 Ultimate, it now can be infected by the Frenzy Virus.


Monsters appearing in Monster Hunter 3 (edit)
Herbivore MH3-Aptonoth Icon Aptonoth MH3-Epioth Icon Epioth MH3-Kelbi Icon Kelbi MH3-Popo Icon Popo MH3-Rhenoplos Icon Rhenoplos
Fish MH3-Fish Icon Fish
Lynian MH3-Felyne Icon Felyne MH3-Melynx Icon Melynx MHFU-Shakalaka Icon Shakalaka
Neopteron MH3-Altaroth Icon Altaroth MH3-Bnahabra Icon Bnahabra
Bird Wyvern MH3-Baggi Icon Baggi MH3-Jaggi Icon Jaggi MH3-Jaggia Icon Jaggia
MH3-Great Baggi Icon Great Baggi MH3-Great Jaggi Icon Great Jaggi MH3-Qurupeco Icon Qurupeco
Brute Wyvern MH3-Barroth Icon Barroth MH3-Deviljho Icon Deviljho MH3-Uragaan Icon Uragaan
Piscine Wyvern MH3-Delex Icon Delex
Leviathan MH3-Ludroth Icon Ludroth MH3-Uroktor Icon Uroktor
MH3-Agnaktor Icon Agnaktor MH3-Gobul Icon Gobul MH3-Lagiacrus Icon Lagiacrus MH3-Royal Ludroth Icon Royal Ludroth
Flying Wyvern MH3-Giggi Icon Giggi
MH3-Barioth Icon Barioth MH3-Diablos Icon Diablos MH3-Gigginox Icon Gigginox MH3-Rathalos Icon Rathalos MH3-Rathian Icon Rathian
Elder Dragon MH3-Question Mark Icon Alatreon MH3-Ceadeus Icon Ceadeus MH3-Jhen Mohran Icon Jhen Mohran
Monsters appearing in Monster Hunter Portable 3rd (edit)
Herbivore MHP3-Anteka Icon Anteka MHP3-Aptonoth Icon Aptonoth MHP3-Kelbi Icon Kelbi MHP3-Popo Icon Popo MHP3-Rhenoplos Icon Rhenoplos MHP3-Slagtoth Icon Slagtoth
Fanged Beast MHP3-Bullfango Icon Bullfango
MHP3-Bulldrome Icon Bulldrome MHP3-Arzuros Icon Arzuros MHP3-Lagombi Icon Lagombi MHP3-Volvidon Icon Volvidon
Lynian MHP3-Felyne Icon Felyne MHP3-Melynx Icon Melynx
Neopteron MHP3-Altaroth Icon Altaroth MHP3-Bnahabra Icon Bnahabra
Bird Wyvern MHP3-Gargwa Icon Gargwa MHP3-Baggi Icon Baggi MHP3-Jaggi Icon Jaggi MHP3-Jaggia Icon Jaggia MHP3-Wroggi Icon Wroggi
MHP3-Great Baggi Icon Great Baggi MHP3-Great Jaggi Icon Great Jaggi MHP3-Great Wroggi Icon Great Wroggi MHP3-Qurupeco Icon Qurupeco MHP3-Crimson Qurupeco Icon Crimson Qurupeco
Brute Wyvern MHP3-Barroth Icon Barroth MHP3-Jade Barroth Icon Jade Barroth MHP3-Deviljho Icon Deviljho MHP3-Duramboros Icon Duramboros MHP3-Uragaan Icon Uragaan MHP3-Steel Uragaan Icon Steel Uragaan
Fanged Wyvern MHP3-Zinogre Icon Zinogre
Piscine Wyvern MHP3-Delex Icon Delex
Leviathan MHP3-Ludroth Icon Ludroth MHP3-Uroktor Icon Uroktor
MHP3-Agnaktor Icon Agnaktor MHP3-Glacial Agnaktor Icon Glacial Agnaktor MHP3-Nibelsnarf Icon Nibelsnarf MHP3-Royal Ludroth Icon Royal Ludroth MHP3-Purple Ludroth Icon Purple Ludroth
Flying Wyvern MHP3-Giggi Icon Giggi
MHP3-Akantor Icon Akantor MHP3-Barioth Icon Barioth MHP3-Sand Barioth Icon Sand Barioth MHP3-Diablos Icon Diablos MHP3-Black Diablos Icon Black Diablos MHP3-Gigginox Icon Gigginox MHP3-Baleful Gigginox Icon Baleful Gigginox MHP3-Nargacuga Icon Nargacuga MHP3-Green Nargacuga Icon Green Nargacuga MHP3-Rathalos Icon Rathalos MHP3-Silver Rathalos Icon Silver Rathalos MHP3-Rathian Icon Rathian MHP3-Gold Rathian Icon Gold Rathian MHP3-Tigrex Icon Tigrex MHP3-Brute Tigrex Icon Brute Tigrex MHP3-Ukanlos Icon Ukanlos
Elder Dragon MHP3-Question Mark Icon Alatreon MHGen-Amatsu Icon Amatsu MHP3-Jhen Mohran Icon Jhen Mohran
Monsters appearing in Monster Hunter 3 Ultimate (edit)
Herbivore MH3U-Anteka Icon Anteka MH3U-Aptonoth Icon Aptonoth MH3U-Epioth Icon Epioth MH3U-Kelbi Icon Kelbi MH3U-Popo Icon Popo MH3U-Rhenoplos Icon Rhenoplos MH3U-Slagtoth Icon Slagtoth
Fish MH3U-Fish Icon Fish
Fanged Beast MH3U-Bullfango Icon Bullfango
MH3U-Arzuros Icon Arzuros MH3U-Lagombi Icon Lagombi MH3U-Volvidon Icon Volvidon
Lynian MH3U-Felyne Icon Felyne MH3U-Melynx Icon Melynx
Neopteron MH3U-Altaroth Icon Altaroth MH3U-Bnahabra Icon Bnahabra
Bird Wyvern MH3U-Gargwa Icon Gargwa MH3U-Baggi Icon Baggi MH3U-Jaggi Icon Jaggi MH3U-Jaggia Icon Jaggia MH3U-Wroggi Icon Wroggi
MH3U-Great Baggi Icon Great Baggi MH3U-Great Jaggi Icon Great Jaggi MH3U-Great Wroggi Icon Great Wroggi MH3U-Qurupeco Icon Qurupeco MH3U-Crimson Qurupeco Icon Crimson Qurupeco
Brute Wyvern MH3U-Barroth Icon Barroth MH3U-Jade Barroth Icon Jade Barroth MH3U-Brachydios Icon Brachydios MH3U-Deviljho Icon Deviljho MH3U-Savage Deviljho Icon Savage Deviljho MH3U-Duramboros Icon Duramboros MH3U-Rust Duramboros Icon Rust Duramboros MH3U-Uragaan Icon Uragaan MH3U-Steel Uragaan Icon Steel Uragaan
Fanged Wyvern MH3U-Zinogre Icon Zinogre MH3U-Stygian Zinogre Icon Stygian Zinogre
Piscine Wyvern MH3U-Delex Icon Delex
MH3U-Plesioth Icon Plesioth MH3U-Green Plesioth Icon Green Plesioth
Leviathan MH3U-Ludroth Icon Ludroth MH3U-Uroktor Icon Uroktor
MH3U-Agnaktor Icon Agnaktor MH3U-Glacial Agnaktor Icon Glacial Agnaktor MH3U-Gobul Icon Gobul MH3U-Lagiacrus Icon Lagiacrus MH3U-Ivory Lagiacrus Icon Ivory Lagiacrus MH3U-Abyssal Lagiacrus Icon Abyssal Lagiacrus MH3U-Nibelsnarf Icon Nibelsnarf MH3U-Royal Ludroth Icon Royal Ludroth MH3U-Purple Ludroth Icon Purple Ludroth
Flying Wyvern MH3U-Giggi Icon Giggi
MH3U-Barioth Icon Barioth MH3U-Sand Barioth Icon Sand Barioth MH3U-Diablos Icon Diablos MH3U-Black Diablos Icon Black Diablos MH3U-Gigginox Icon Gigginox MH3U-Baleful Gigginox Icon Baleful Gigginox MH3U-Nargacuga Icon Nargacuga MH3U-Green Nargacuga Icon Green Nargacuga MH3U-Lucent Nargacuga Icon Lucent Nargacuga MH3U-Rathalos Icon Rathalos MH3U-Azure Rathalos Icon Azure Rathalos MH3U-Silver Rathalos Icon Silver Rathalos MH3U-Rathian Icon Rathian MH3U-Pink Rathian Icon Pink Rathian MH3U-Gold Rathian Icon Gold Rathian
Elder Dragon MH3U-Question Mark Icon Alatreon MH3U-Ceadeus Icon Ceadeus MH3U-Goldbeard Ceadeus Icon Goldbeard Ceadeus MH3U-Question Mark Icon Dire Miralis MH3U-Jhen Mohran Icon Jhen Mohran MH3U-Hallowed Jhen Mohran Icon Hallowed Jhen Mohran
Monsters appearing in Monster Hunter 4 (edit)
Herbivore MH4U-Aptonoth Icon Aptonoth MH4U-Kelbi Icon Kelbi MH4U-Popo Icon Popo MH4U-Rhenoplos Icon Rhenoplos MH4U-Slagtoth Icon Slagtoth
Amphibian MH4U-Zamite Icon Zamite
MH4U-Tetsucabra Icon Tetsucabra MH4U-Zamtrios Icon Zamtrios
Fanged Beast MH4U-Conga Icon Conga
MH4U-Congalala Icon Congalala MH4U-Emerald Congalala Icon Emerald Congalala MH4U-Kecha Wacha Icon Kecha Wacha MH4U-Lagombi Icon Lagombi MH4U-Rajang Icon Rajang MH4U-Furious Rajang Icon Furious Rajang
Lynian MH4U-Felyne Icon Felyne MH4U-Melynx Icon Melynx
Neopteron MH4U-Altaroth Icon Altaroth MH4U-Bnahabra Icon Bnahabra MH4U-Konchu Icon Konchu
MH4U-Seltas Icon Seltas MH4U-Seltas Queen Icon Seltas Queen
Temnoceran MH4U-Nerscylla Icon Nerscylla
Bird Wyvern MH4U-Gargwa Icon Gargwa MH4U-Genprey Icon Genprey MH4U-Ioprey Icon Ioprey MH4U-Jaggi Icon Jaggi MH4U-Jaggia Icon Jaggia MH4U-Velociprey Icon Velociprey
MH4U-Gendrome Icon Gendrome MH4U-Great Jaggi Icon Great Jaggi MH4U-Gypceros Icon Gypceros MH4U-Purple Gypceros Icon Purple Gypceros MH4U-Iodrome Icon Iodrome MH4U-Velocidrome Icon Velocidrome MH4U-Yian Garuga Icon Yian Garuga MH4U-Yian Kut-Ku Icon Yian Kut-Ku MH4U-Blue Yian Kut-Ku Icon Blue Yian Kut-Ku
Brute Wyvern MH4U-Brachydios Icon Brachydios MH4U-Deviljho Icon Deviljho MH4U-Savage Deviljho Icon Savage Deviljho
Fanged Wyvern MH4U-Zinogre Icon Zinogre MH4U-Stygian Zinogre Icon Stygian Zinogre
Piscine Wyvern MH4U-Delex Icon Delex
Snake Wyvern MH4U-Remobra Icon Remobra
MH4U-Najarala Icon Najarala
Flying Wyvern MH4U-Akantor Icon Akantor MH4U-Basarios Icon Basarios MH4U-Ruby Basarios Icon Ruby Basarios MH4U-Gravios Icon Gravios MH4U-Black Gravios Icon Black Gravios MH4U-Khezu Icon Khezu MH4U-Red Khezu Icon Red KhezuMH4U-Rathalos Icon Rathalos MH4U-Azure Rathalos Icon Azure Rathalos MH4U-Silver Rathalos Icon Silver Rathalos MH4U-Rathian Icon Rathian MH4U-Pink Rathian Icon Pink Rathian MH4U-Gold Rathian Icon Gold Rathian MH4U-Tigrex Icon Tigrex MH4U-Brute Tigrex Icon Brute Tigrex MH4U-Molten Tigrex Icon Molten Tigrex
Elder Dragon MH4U-Dalamadur-Head Icon Dalamadur MH4U-Dah'ren Mohran Icon Dah'ren Mohran MH4U-Unknown Icon Fatalis MH4U-Unknown Icon Crimson Fatalis MH4U-Kirin Icon Kirin MH4U-Oroshi Kirin Icon Oroshi Kirin MH4U-Kushala Daora Icon Kushala Daora MH4U-Shagaru Magala Icon Shagaru Magala MH4U-Teostra Icon Teostra
??? MH4U-Gore Magala Icon Gore Magala
Monsters appearing in Monster Hunter 4 Ultimate (edit)
Herbivore MH4U-Apceros Icon Apceros MH4U-Aptonoth Icon Aptonoth MH4U-Kelbi Icon Kelbi MH4U-Popo Icon Popo MH4U-Rhenoplos Icon Rhenoplos MH4U-Slagtoth Icon Slagtoth
Amphibian MH4U-Zamite Icon Zamite
MH4U-Tetsucabra Icon Tetsucabra MH4U-Berserk Tetsucabra Icon Berserk Tetsucabra MH4U-Zamtrios Icon Zamtrios MH4U-Tigerstripe Zamtrios Icon Tigerstripe Zamtrios
Fanged Beast MH4U-Conga Icon Conga
MH4U-Congalala Icon Congalala MH4U-Emerald Congalala Icon Emerald Congalala MH4U-Kecha Wacha Icon Kecha Wacha MH4U-Ash Kecha Wacha Icon Ash Kecha Wacha MH4U-Lagombi Icon Lagombi MH4U-Rajang Icon Rajang MH4U-Furious Rajang Icon Furious Rajang
Lynian MH4U-Felyne Icon Felyne MH4U-Melynx Icon Melynx
Carapaceon MH4U-Hermitaur Icon Hermitaur
MH4U-Daimyo Hermitaur Icon Daimyo Hermitaur MH4U-Plum Daimyo Hermitaur Icon Plum Daimyo Hermitaur
Neopteron MH4U-Altaroth Icon Altaroth MH4U-Bnahabra Icon Bnahabra MH4U-Konchu Icon Konchu
MH4U-Seltas Icon Seltas MH4U-Desert Seltas Icon Desert Seltas MH4U-Seltas Queen Icon Seltas Queen MH4U-Desert Seltas Queen Icon Desert Seltas Queen
Temnoceran MH4U-Nerscylla Icon Nerscylla MH4U-Shrouded Nerscylla Icon Shrouded Nerscylla
Bird Wyvern MH4U-Gargwa Icon Gargwa MH4U-Genprey Icon Genprey MH4U-Ioprey Icon Ioprey MH4U-Jaggi Icon Jaggi MH4U-Jaggia Icon Jaggia MH4U-Velociprey Icon Velociprey
MH4U-Gendrome Icon Gendrome MH4U-Great Jaggi Icon Great Jaggi MH4U-Gypceros Icon Gypceros MH4U-Purple Gypceros Icon Purple Gypceros MH4U-Iodrome Icon Iodrome MH4U-Velocidrome Icon Velocidrome MH4U-Yian Garuga Icon Yian Garuga MH4U-Yian Kut-Ku Icon Yian Kut-Ku MH4U-Blue Yian Kut-Ku Icon Blue Yian Kut-Ku
Brute Wyvern MH4U-Brachydios Icon Brachydios MH4U-Raging Brachydios Icon Raging Brachydios MH4U-Deviljho Icon Deviljho MH4U-Savage Deviljho Icon Savage Deviljho
Fanged Wyvern MH4U-Zinogre Icon Zinogre MH4U-Stygian Zinogre Icon Stygian Zinogre
Piscine Wyvern MH4U-Delex Icon Delex MH4U-Cephalos Icon Cephalos
MH4U-Cephadrome Icon Cephadrome
Snake Wyvern MH4U-Remobra Icon Remobra
MH4U-Najarala Icon Najarala MH4U-Tidal Najarala Icon Tidal Najarala
Flying Wyvern MH4U-Akantor Icon Akantor MH4U-Basarios Icon Basarios MH4U-Ruby Basarios Icon Ruby Basarios MH4U-Diablos Icon Diablos MH4U-Black Diablos Icon Black Diablos MH4U-Gravios Icon Gravios MH4U-Black Gravios Icon Black Gravios MH4U-Khezu Icon Khezu MH4U-Red Khezu Icon Red Khezu MH4U-Monoblos Icon Monoblos MH4U-White Monoblos Icon White Monoblos MH4U-Rathalos Icon Rathalos MH4U-Azure Rathalos Icon Azure Rathalos MH4U-Silver Rathalos Icon Silver Rathalos MH4U-Rathian Icon Rathian MH4U-Pink Rathian Icon Pink Rathian MH4U-Gold Rathian Icon Gold Rathian MH4U-Seregios Icon Seregios MH4U-Tigrex Icon Tigrex MH4U-Brute Tigrex Icon Brute Tigrex MH4U-Molten Tigrex Icon Molten Tigrex MH4U-Ukanlos Icon Ukanlos
Elder Dragon MH4U-Chameleos Icon Chameleos MH4U-Dalamadur-Head Icon Dalamadur MH4U-Shah Dalamadur-Head Icon Shah Dalamadur MH4U-Dah'ren Mohran Icon Dah'ren Mohran MH4U-Unknown Icon Fatalis MH4U-Unknown Icon Crimson Fatalis MH4U-Unknown Icon White Fatalis MH4U-Unknown Icon Gogmazios MH4U-Kirin Icon Kirin MH4U-Oroshi Kirin Icon Oroshi Kirin MH4U-Kushala Daora Icon Kushala Daora MH4U-Rusted Kushala Daora Icon Rusted Kushala Daora MH4U-Shagaru Magala Icon Shagaru Magala MH4U-Teostra Icon Teostra
??? MH4U-Gore Magala Icon Gore Magala MH4U-Chaotic Gore Magala Icon Chaotic Gore Magala
Advertisement